Q
How to Login in GBooks?
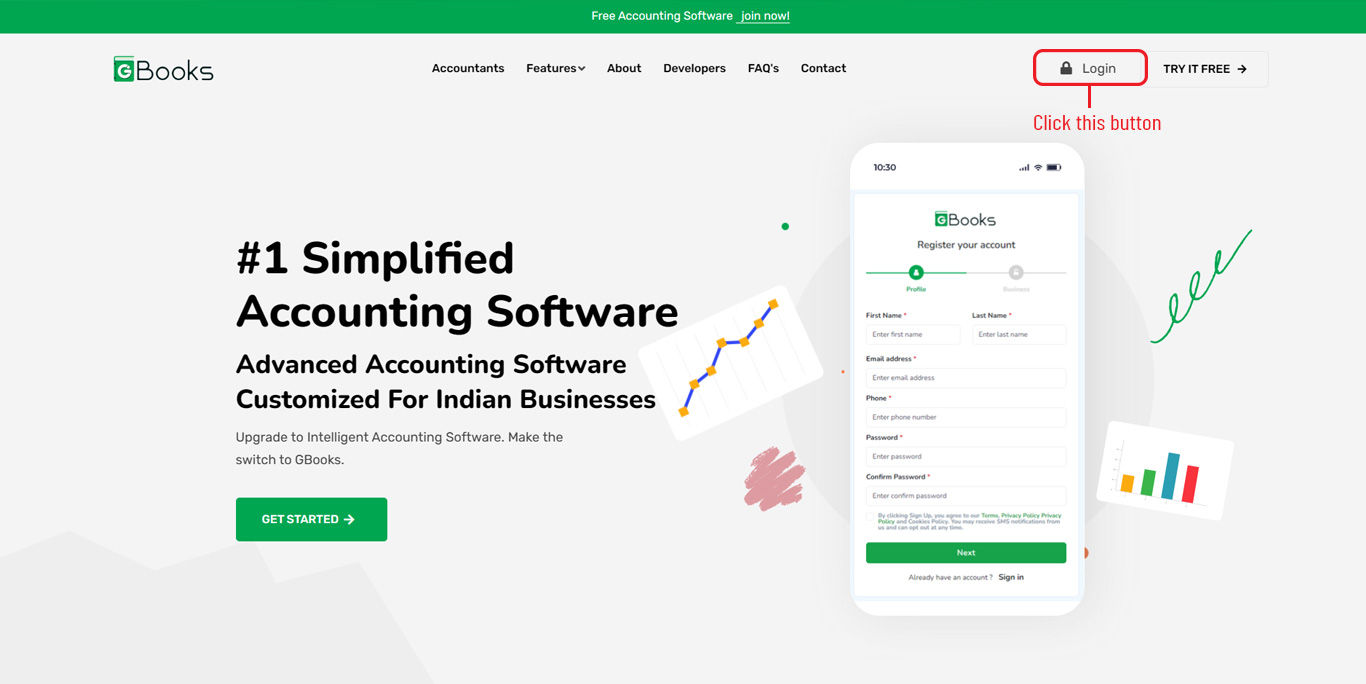
Click the 'Sign In' Button
- Once the Gbooks homepage is loaded, locate the "Login" button. It is typically located in the top-right corner of the page.
- Click on "Login" to proceed to the login screen.
Offering multiple login options provides flexibility, allowing users to choose the most convenient and secure option based on their preferences and security needs. Services often use a combination of these methods to appeal to a broader range of users, accommodating both security-conscious users and those who prioritize ease of use.

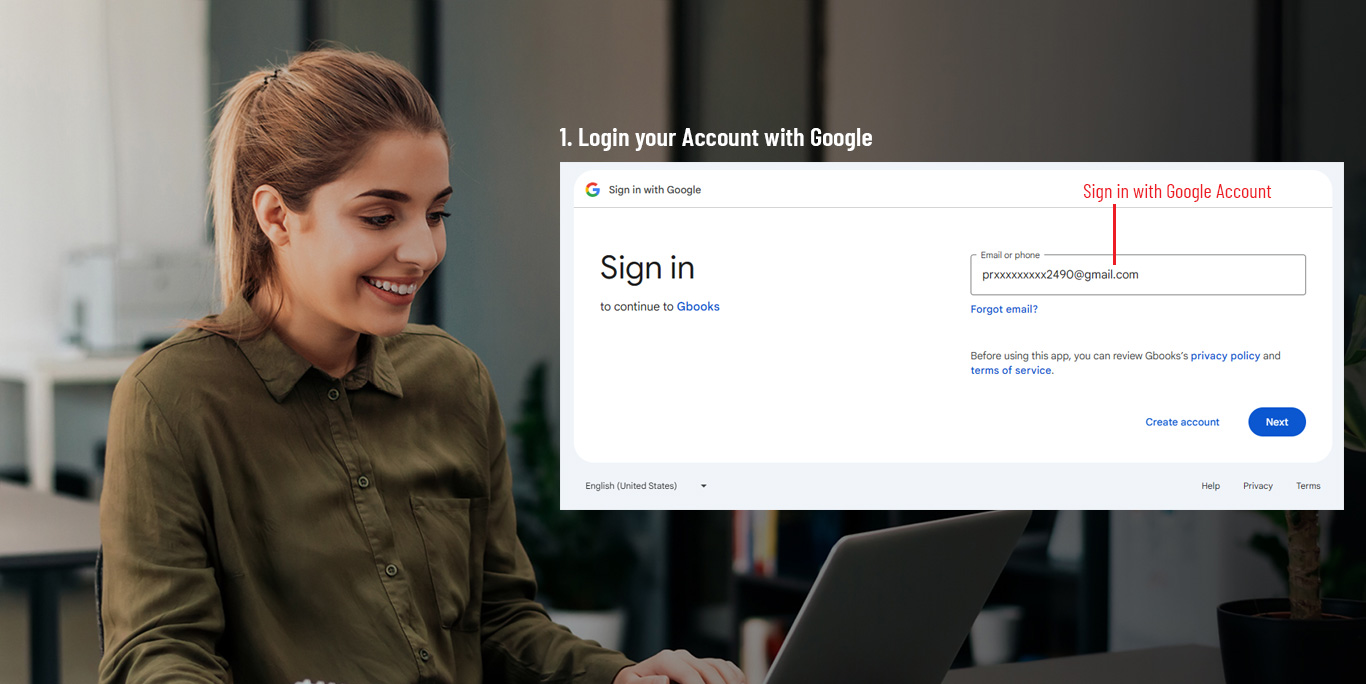
1. Login with Google
How it works: This method allows users to authenticate themselves using their Google account credentials. When they choose "Login with Google," they are prompted to sign in to their Google account (if they are not already logged in), and the system will automatically grant access based on the authentication from Google.

User Clicks "Login with Google": When a user selects the "Login with Google" button, they are redirected to a Google authentication page or a pop-up window, depending on the service's setup.
Google Sign-In Prompt:
- Already Logged In: If the user is already signed into their Google account in the browser or app, they will be automatically authenticated, and the login process will continue without requiring additional input.
- Not Logged In: If the user is not logged into their Google account, they will be prompted to enter their Google credentials (email and password).
Authentication and Authorization: Once the user grants permission (if required), Google sends an authentication token (or access token) to the third-party service, confirming the user's identity.
2. Login with Email
The Login with Email method is one of the most common authentication processes for accessing online services. It involves using a unique email address and password combination to authenticate the user. Here’s a detailed breakdown of how the Login with Email process works:

Step-by-Step Process for Login with Email:
1. User Clicks "Login with Email":
- When the user chooses to log in with their email, they are typically prompted to enter their registered email address and password.
2. Email Address Input:
- The user is asked to enter their email address in a text field. This email address serves as their unique identifier for the account.
3. Password Input:
- After entering their email, the user is prompted to input the password associated with that email account. The password is a secret credential known only to the user.
4. Submit Credentials:
- Once both the email address and password are entered, the user clicks the "Login" button to submit their login request.
5. Authentication Process:
- Backend Verification: The system checks the entered email and password against the stored data in its database. The password is typically hashed (for security reasons) before it’s stored, so, during verification, the system hashes the entered password and compares it with the stored hash.
- Successful Match: If the entered credentials (email and password) match the ones in the database, the system grants access to the user’s account.
- Failed Match: If the credentials don't match, the user is usually shown an error message like "Incorrect email or password" and is given the option to try again.
6. Access Granted:
- Upon successful authentication, the user is logged in, and they are granted access to the system or platform (e.g., a website, app, or service).
- They are typically directed to their user dashboard or homepage.
3. Login with your Phone Number
The Login with Phone Number method is a convenient way for users to authenticate themselves on a platform using their mobile phone number, often combined with a one-time passcode (OTP) sent via SMS or other methods. Below is a step-by-step breakdown of how this process typically works:

Step-by-Step Process for Login with Phone Number:
1. User Clicks "Login with Phone Number":
- When the user selects the "Login with Phone Number" option, they are prompted to enter their mobile phone number in the provided field.
2. Phone Number Input:
- The user enters their mobile phone number, including the country code (e.g., +91 for the India, +44 for the UK, +1 for the USA), ensuring it's correctly formatted.
3. Submit Phone Number:
- After entering the phone number, the user clicks the "GET OTP" button to proceed with the authentication process.
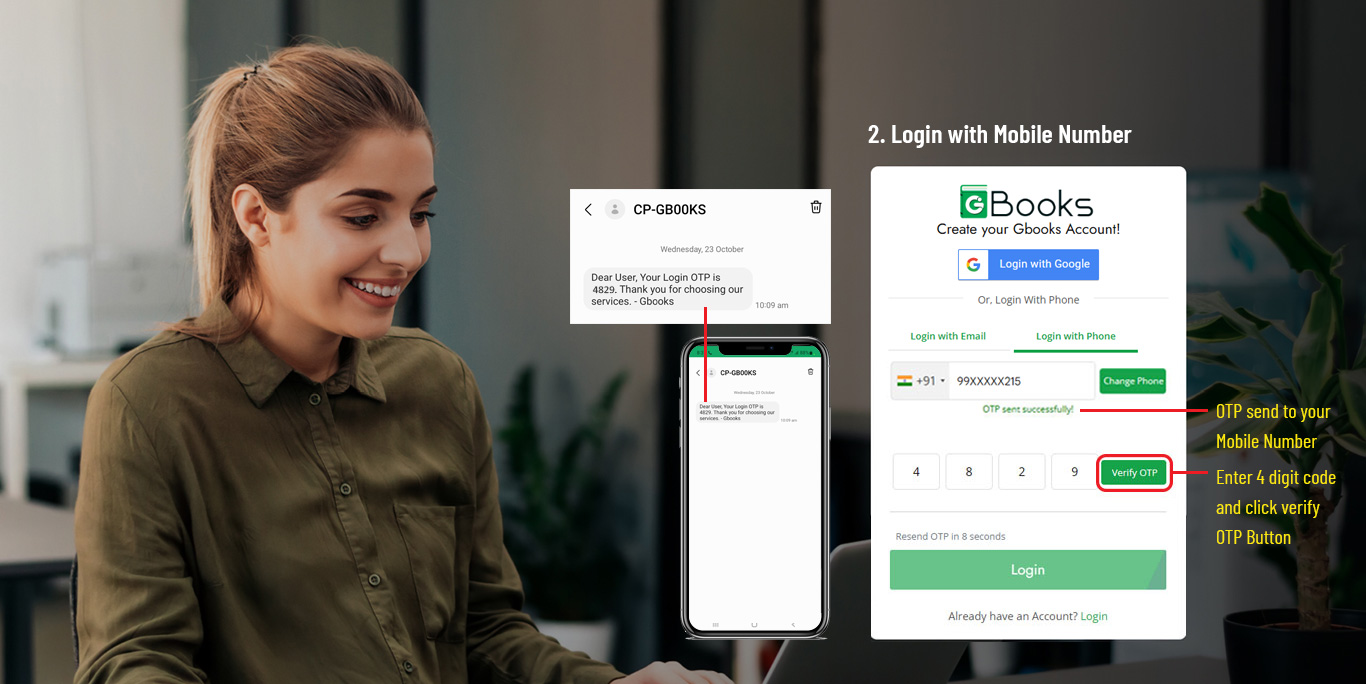
4. OTP (One-Time Passcode) Sent via SMS:
- Once the phone number is submitted, the system sends an SMS with a one-time passcode (OTP) to the phone number provided by the user.
- This OTP is a randomly generated code, usually 4 to 6 digits, designed to be used only once and typically expires after a short period (e.g., 5-10 minutes).
- In some systems, instead of SMS, the OTP may be sent via other methods like email, voice call, or an authentication app (depending on the service's setup).
5. User Enters OTP:
- After receiving the OTP on their phone, the user enters the one-time passcode (OTP) into the application or website in the provided field.
6. Submit OTP for Verification:
- The user clicks the "Submit" button after entering the OTP. The system verifies that the OTP matches the one sent to the phone number.
7. OTP Verification:
- The system checks the entered OTP against the one that was sent to the phone number.
- Successful Match: If the OTP matches and is still valid, the system grants the user access to their account or the platform.
- Failed Match: If the OTP does not match or has expired, the user will typically be shown an error message and be given the option to resend the OTP or try again.
8. Access Granted:
- Once the OTP is verified successfully, the user is logged in and redirected to their account’s dashboard or the main page of the service.
9. Dashboard:
- After successful login, the platform may create a session for the user, allowing them to remain logged in until they choose to log out or the session expires.
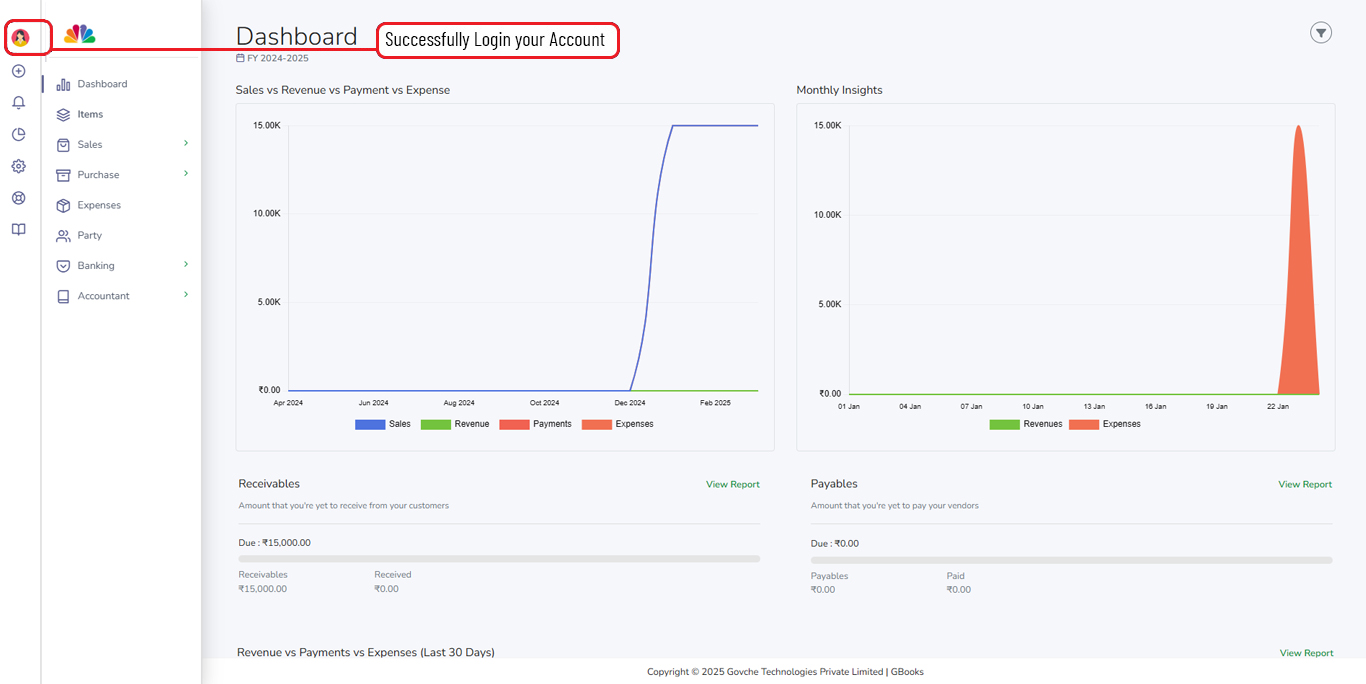
Successfully log in to your Account.